

The Easy Way to Change a Flat Tire on a Triathlon Bike

If you've ever found yourself on the side of the road struggling to change a flat tire, this is for you.
Nothing ruins the party like getting a flat tire in the middle of a bike ride.
Hopefully, you remembered to bring a flat kit (and know how to change a tire) or you’re up sh!t creek without a tube.
Don’t worry.
Changing a flat isn’t as hard as it seems. All you need is the proper tools and some good technique, and you’ll be back on your bike in no time.
The second post in our Back to (Triathlon) School Series is how to change a flat tire.
Today, we’ll go step-by-step through the process of changing a flat (with pictures). We’ll talk about the different causes of a flat, the essential items you should keep in your flat kit, and I’ll explain my trick for getting tight tires back on the rim.
*Paid subscribers get access to a video where we’ll go through the process of changing a tire, together!
Potential causes of a flat tire
The most common reason why you might get a flat tire is from a puncture. There’s all kinds of debris on roads: glass, broken bottles, pieces of metal, staples, screws, sharp rocks, ect. All it takes is for a sharp point to poke through your tire and puncture the tube inside, and BANG, you have a flat.
Another reason might be that your tire is old and worn out. Tires don’t last forever. If the rubber is overused, that makes the tire more susceptible to tearing and puncture. If your tire is “bald” (has no visible tread on the surface), has cracks, or has been sitting in the garage for years, it’s time to replace.
A third cause is a pinch flat. This is especially frustrating because it happens as you’re trying to fix the flat that got you in this situation in the first place! A pinch flat can happen when the tube isn’t situated properly inside the channel of the wheel. Then, when you try to re-inflate, it pinches the tube causing a puncture.
Finally, a flat could be caused by a sidewall blowout. This might be the result of wear and tear, cracks or bulges in the rubber, prolonged and sustained braking (rim brakes) on descents, improper inflation, or sudden impact against a pothole.
Today, we’re going over the most common reason for a flat- a puncture caused by debris.
Back to (Triathlon) School: How to Execute a Successful Transition
What to keep in your flat kit

You can’t change a flat tire without the right tools. Here’s what you need.
Tube that fits the size of your tire
Tire levers
Co2 cartridge (I carry two)
Co2 cartridge adapter
Another helpful item is a dollar bill or empty gel wrapper in case you get a large slit in your tire. In this case, you would need to create a barrier on the inside of the tire so the tube won’t poke out and cause a pinch flat.
If you have deep race wheels, make sure that your spare tube has the correct valve extender. This is a small metal piece that makes the valve long enough to extend through the deep wheel. Otherwise, you can’t pump it up! You may also need a mini wrench to remove the valve extender from the existing tube, if you don’t already have your spare tube set up with one.
*Note: this applies to tires with tubes. If you have tubeless tires, the process for dealing with a flat is different.
How to change a flat tire
When changing a flat, the first thing you must do is remove the wheel from the bike. Determine whether you have a quick release or thru axle, because the process is a bit different. To remove a quick release, loosen the attached lever, unscrew the threaded nut, and slide the metal rod out of the hub of your wheel. To remove a thru axle, you might use an Allen key or a built-in lever to unscrew the axle and remove it from the wheel.
Next, you must let all the air out of the tire. First, remove the valve cover (small, plastic cap). Then, unscrew the top of the valve. Press down on the valve to let all the air out of the tire. You also need to unscrew the nut on the valve, remove it, and set it aside.


Step 1: Remove valve cover, unscrew nut, press valve to release air
Now, you need to break the seal of the tire. You can do this by using your thumbs to press along the sidewall of the tire. Start on one side of the tire and gradually work your way around, pressing in, and breaking the seal as you go.


Step 2: Break the seal, use tire lever to slide tire edge off rim
Repeat this process on the other side of the tire. Now, use a tire lever and slide it in between the tire and the rim. Using leverage from the tire lever, slide it either forward or backward to loosen the tire from the rim and get the edge to pop over. Slide it all the way around the tire so it pops off the rim.

Step 3: Now, you can pull out the tube and inspect the tire for any debris.
At this point, you can reach inside the tire and pull out the tube.
The next step is to look inside the tire and see if there’s any pieces of debris or sharp metal sticking through that might have caused the flat. You can carefully run your finger along the inside to see if you feel something sharp. Look on the outside of the tire as well.
Once you’ve removed the debris that caused the puncture, it’s time to put in a new tube.
TIP: Use your mouth to blow some air inside the tube, just enough to give it some shape. This makes it easier to work with. Then, screw the valve down so the air doesn’t escape.
Slide the valve back inside the hole on the rim, and put the tube inside the tire. Now, it’s time to put the tire back on the rim. Remember that most tires are directional and should have a small arrow on the sidewall indicating the direction of travel.
Another good tip is to start opposite the valve. This is because the valve naturally creates a bit more space in the channel. If you start at the valve and work your way around, it will be very tight once you get to the end and hard to pop the last edge over. Instead, start opposite the valve, and it will make your life much easier.
Start on one side and use your thumbs to push the wall of the tire back over the rim and into the channel. Work on both sides of the tire, gradually moving towards the bottom where the valve is located. The first part should be pretty easy, but it can get harder as you get closer to the bottom.


Step 4: Start opposite the valve. Push the wall of the tire back into the channel.
This is where my trick comes in! Instead of hurting your fingers and struggling to get the last edge over, use the pinch technique. Place the valve area on the ground by your feet. Starting back at the top of the tire, pinch both sides of the tire, left hand on the left side and right hand on the right side. Then, move down a bit on either side and pinch it again, working your way around the whole tire until you get to the last stubborn bit. You should have more space now at the bottom.
Repeat the process again, and you’ll get even more space. Once I do the pinch technique 2-3 times, I rarely have to use a tire lever and can pop the edge over with my thumbs. Super easy!
The goal with pinching the tire is to get the tube as high up into the tire and away from the channel as possible, because this helps create more space for the tire to get inside. You can also use a tire lever to roll the edge of the tire over the rim, being careful not to grab the tube that’s inside.


Step 5: If needed, use a tire lever to get the last edge over. I used the pinch technique three times and now I can just push it over with my thumb!
Once both sides of the tire are back on the rim, you must make sure the tube is completely inside the tire. Otherwise, when you reinflate, it might cause a pinch flat. To check, simply push the tire toward the inner channel slightly with your finger and make sure you can’t see any of the tube. Do this all the way around the tire, on both sides. No tube is showing so we’re all good!
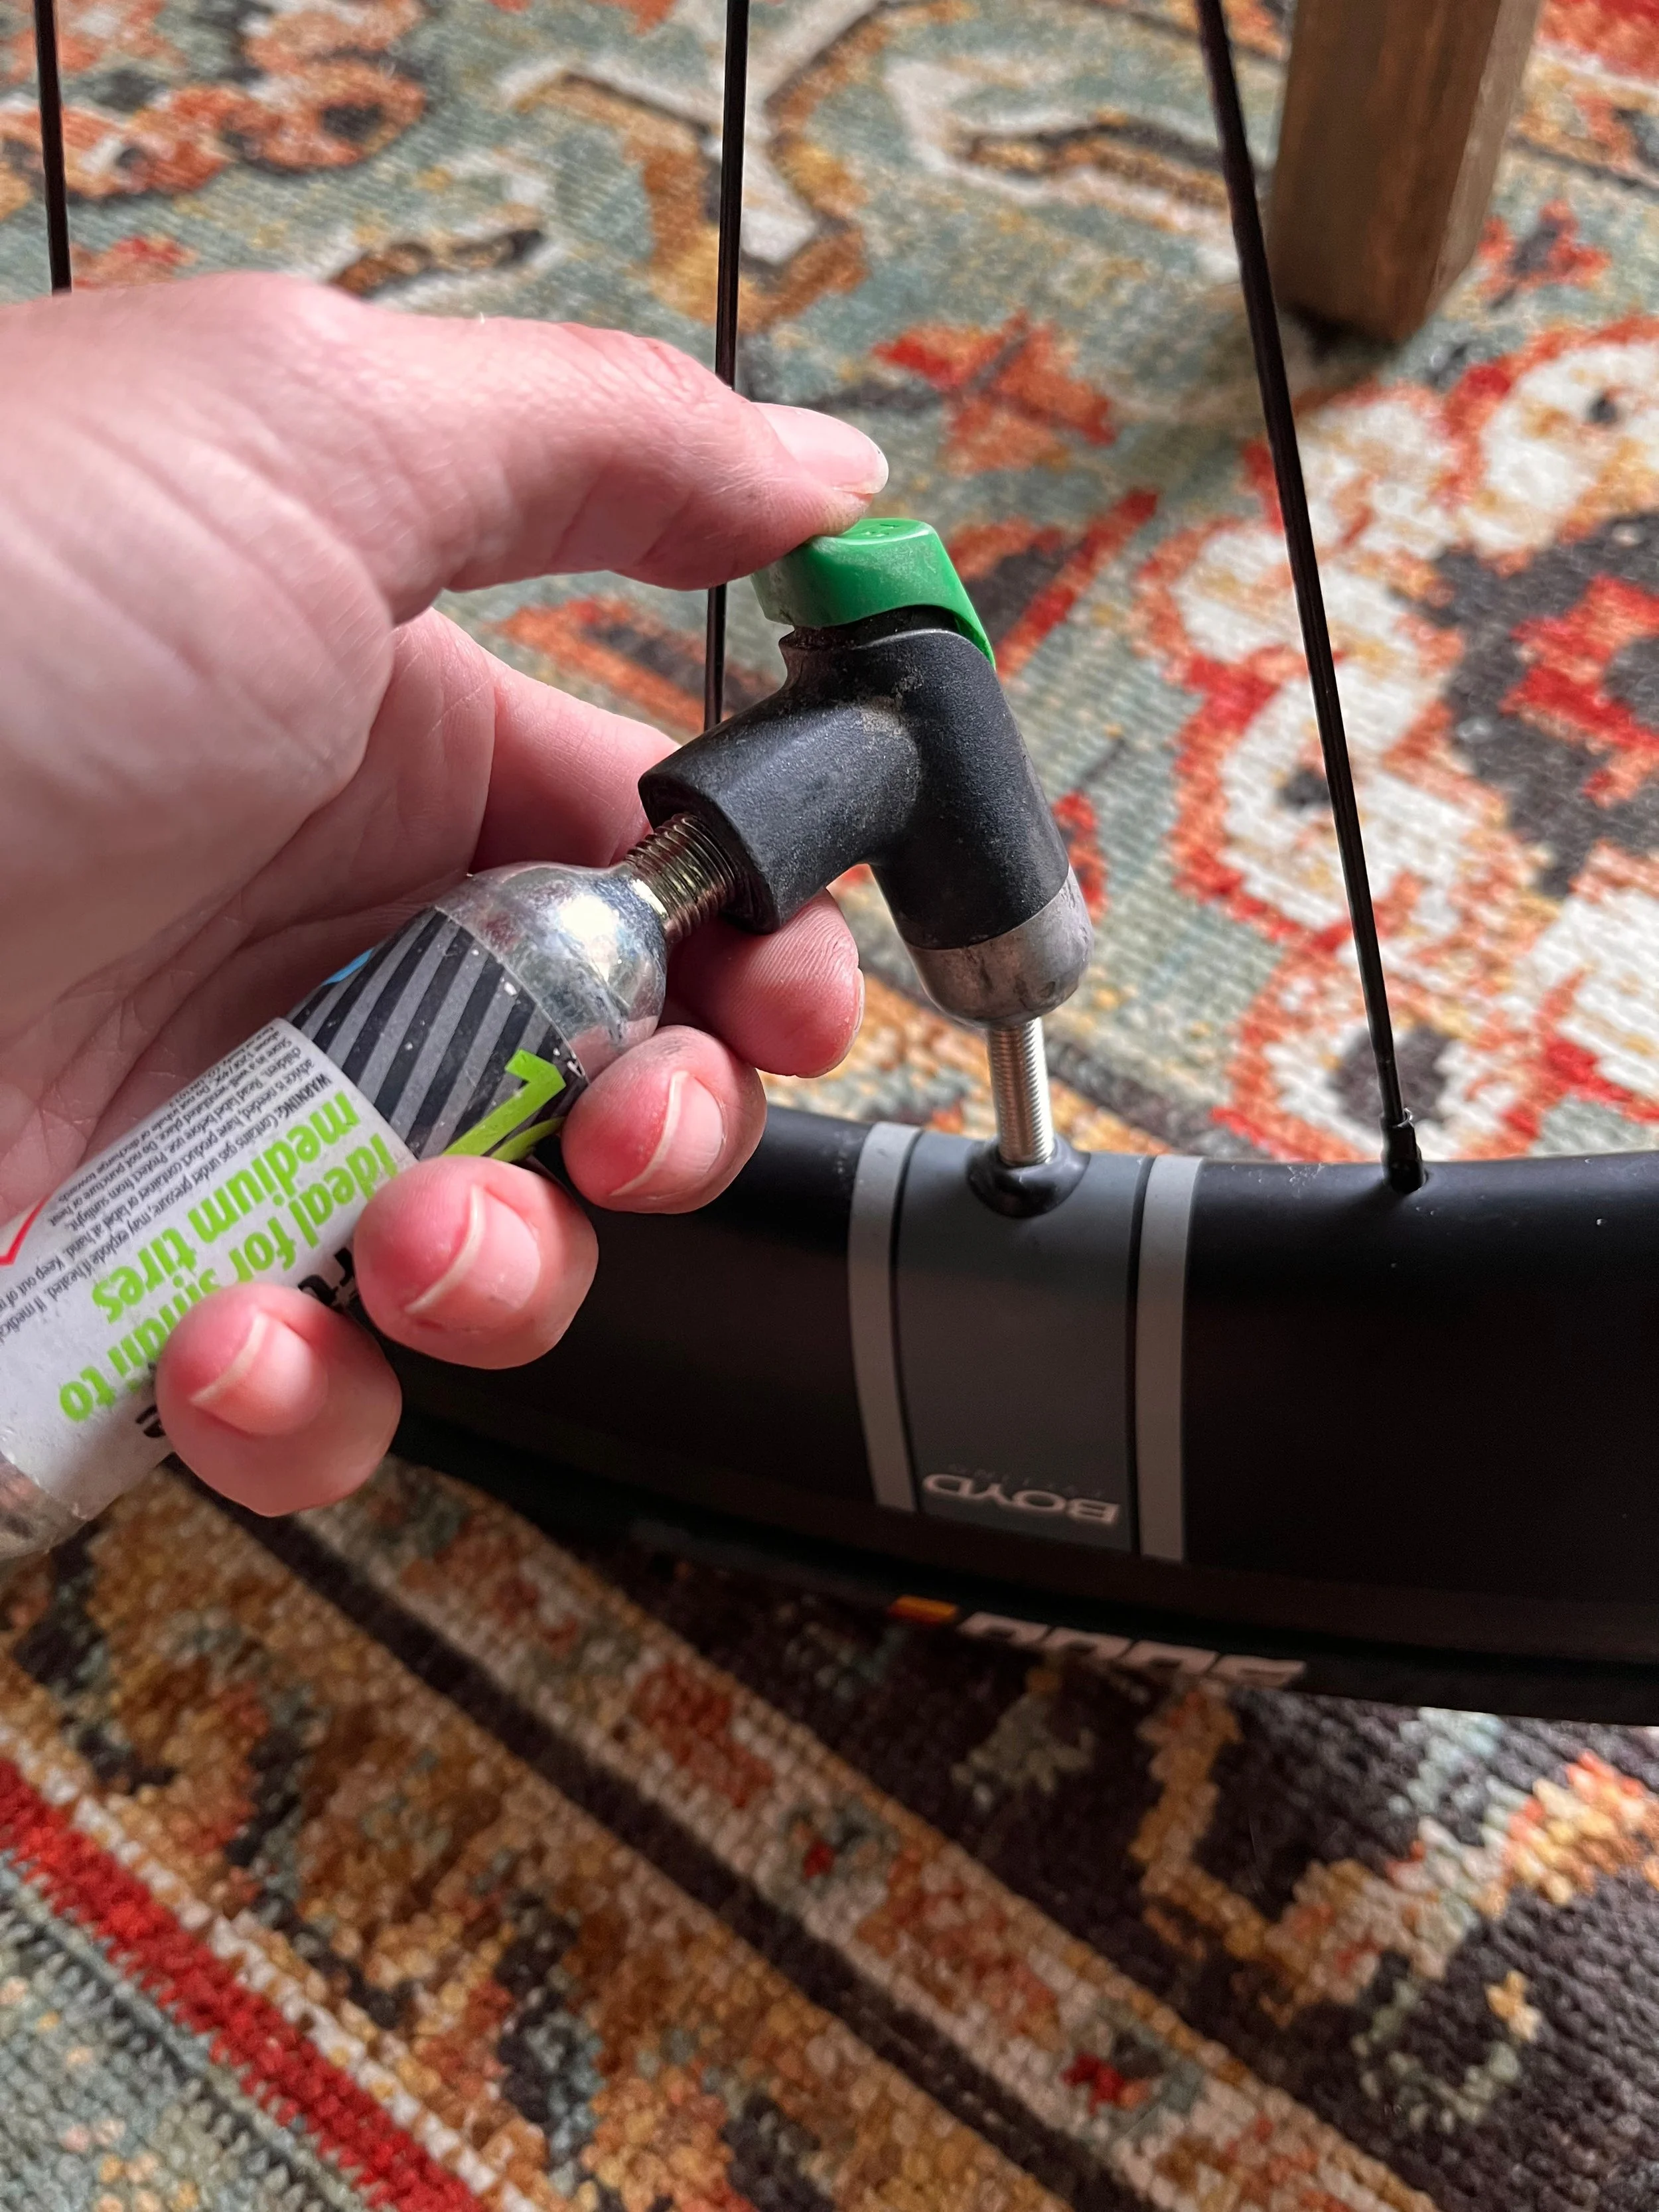
Step 6: Reinflate with a Co2 cartridge. I didn’t screw the Co2 all the way into the adapter for this picture (as you can still see the threads) because I don’t actually need to change my tire and don’t want to waste it. :) I like this CO2 adapter because it has a button to press.
The last step is to reinflate the tire with a Co2 cartridge. Screw the cartridge into the adapter and press it down on the valve. All adapters are a bit different. I prefer one with a button that you push to inflate. You will hear a loud whooshing sound as the tire inflates. This is normal. You may also hear a loud crack or pop sound; that’s the tire seating back on the rim, and it’s normal as well.
Inflate the tire until you can press the exterior firmly and it has the tiniest bit of give. Be careful when handling the Co2 cartridge afterwards, because it will be very cold and can burn your fingers.
I didn’t screw the Co2 all the way into the adapter for this picture (as you can still see the threads) because I don’t actually need to change my tire and don’t want to waste it. :) I like this CO2 adapter because it has a button to press.
TIP: Inflating a tire with Co2 is enough to get you home, but the air pressure will decrease over time. Once you’re done with the ride, you should reinflate the tire with a regular bike pump.
Hopefully, you now feel a bit more confident about changing a flat tire. Remember, all you need is the right tools, some good tips, and a bit of patience.
If you’d like more hands-on instruction, paid subscribers get access to a video where we go through the process of changing a tire, together!